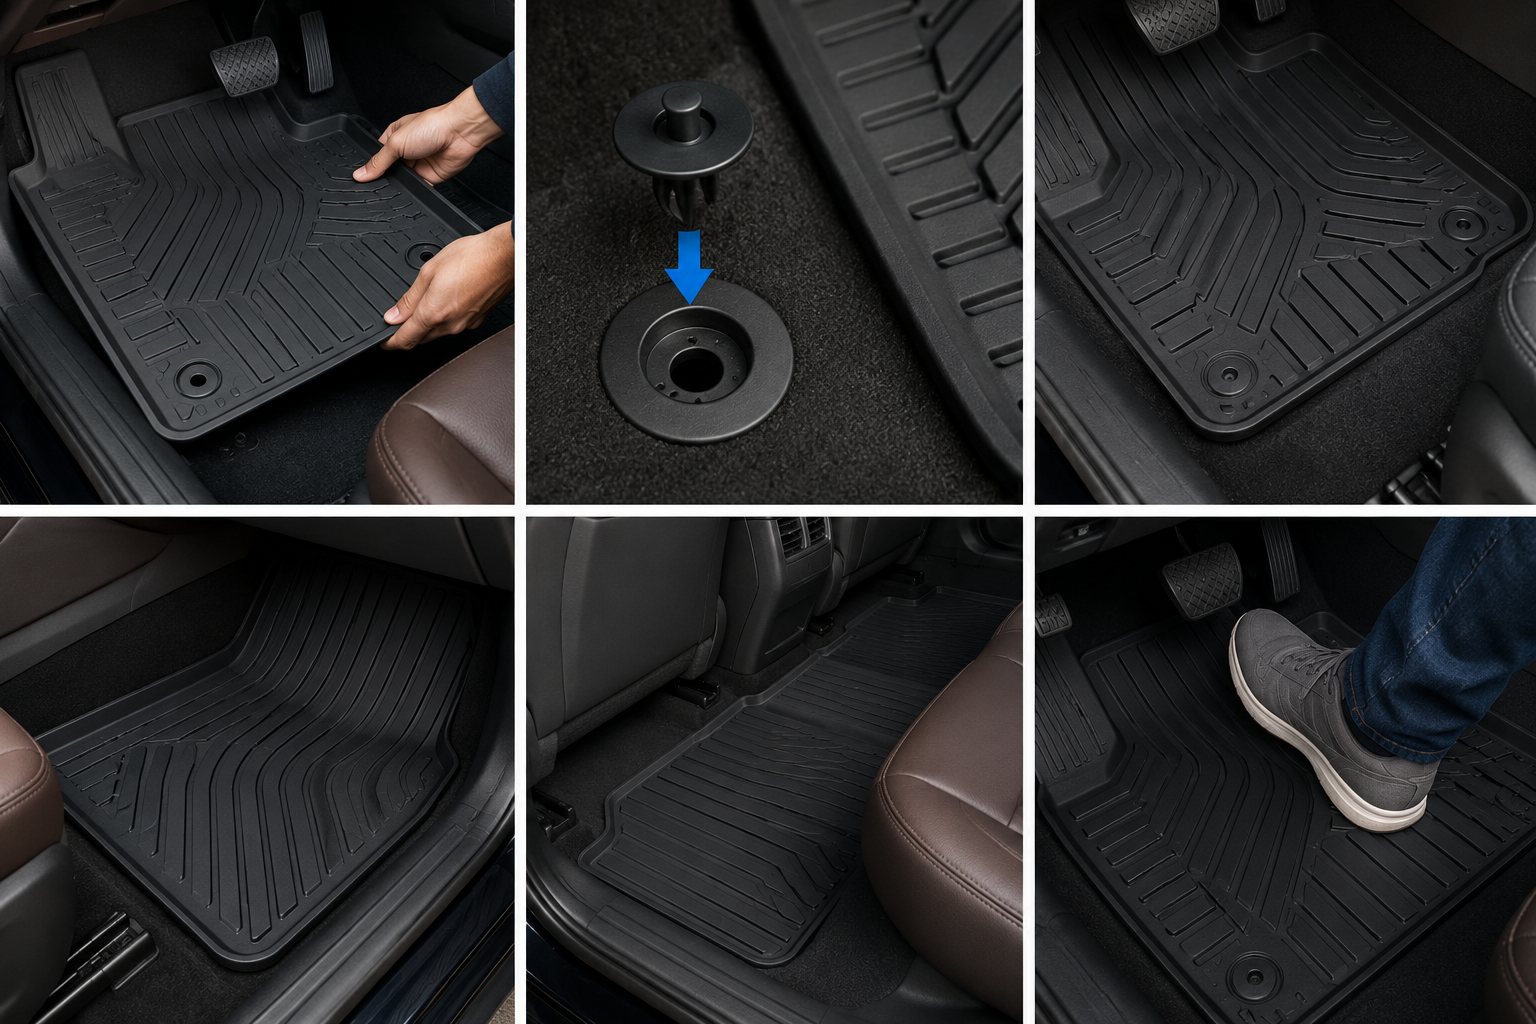
Your new floor mats are sitting in the footwell, but the driver’s side won’t lie flat, or you’re not sure it’s far enough from the brake pedal to be safe. That’s a fair thing to double-check—how to install car floor mats correctly starts with getting the fit and position right. A mat that isn’t secured properly is one of the most common reasons floor mats get returned or need to be reinstalled.
Quick Answer: To install car floor mats correctly, remove the old mats, vacuum the footwell, position the new mat against the firewall with the heel pad under your foot, then lock it onto the factory anchors, clips, or non-slip backing. Finish by pressing the accelerator and brake fully to the floor to confirm nothing catches.
What You Need to Know
- A mat that’s even half an inch too close to the pedal can interfere with how far the pedal travels.
- Factory anchor posts, clip-style retainers, and non-slip backing are the three main ways mats stay in place—check which one your car actually has before you buy replacements.
- Universal mats almost always need trimming; custom-fit mats rarely do.
- Never stack a new mat on top of an old one — the anchors can’t hold two layers, and neither one will feel secure.
- No federal standard regulates a floor mat’s grip or thickness—only its flammability resistance is federally regulated, so fit and securing method matter more than anything printed on the packaging.
Table of Contents
Check Your Floor Mat Fit Before You Install
A floor mat fits correctly when it covers the entire footwell floor and lines up with your vehicle’s factory anchor points without extending past them. Lay the mat in the footwell before doing anything else—don’t unbox it and start clipping it.
If you bought a custom-fit mat for your exact make, model, and year, it should reach every edge of the footwell and match any embossed floor contours. If you bought a universal mat, expect some gap, overhang, or a shape that doesn’t quite match your firewall—that’s normal, and it’s what the trimming section below is for.
Check the underside for a locking mechanism (grommets, hooks, or loops) before deciding how you’re going to secure it. A mat with grommets but no matching anchors in your car is a mismatch, not a fit issue you can trim your way out of.
How to Install Car Floor Mats Correctly : Step-by-Step
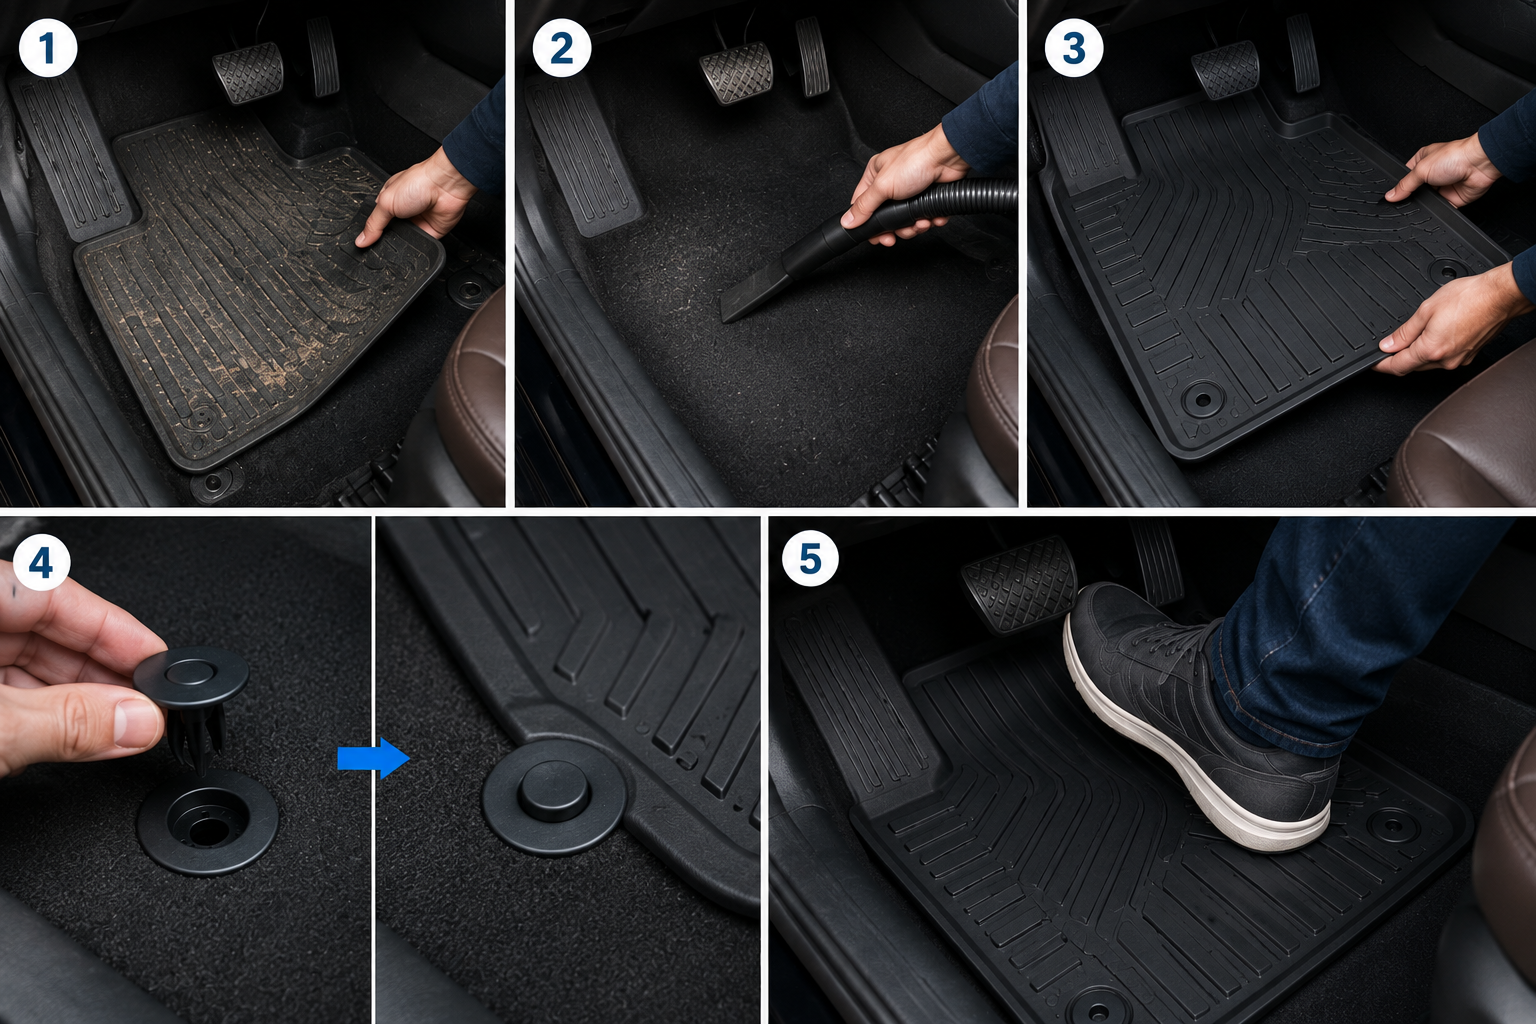
Installing a floor mat correctly takes five steps, and skipping the last one is the most common reason mats end up interfering with a pedal.
Step 1: Remove the Old Mats
Lift the old mat straight up and out — most mats without adhesive backing come free in a few seconds. Shake it out away from the car before setting it down so loose dirt doesn’t end up back in the footwell.
If your old mat has adhesive strips or was glued down, work a plastic trim tool under one corner first rather than pulling straight up, which can tear the carpet backing underneath.
Step 2: Clean the footwell.
Vacuum the entire footwell, spending extra time — about 30 to 60 seconds per side — on the seam where the carpet meets the firewall. That seam traps small debris that creates a bump under the new mat if it isn’t cleared out.
Wipe down any hard plastic trim with a damp cloth if there’s residue, and let everything dry completely. Installing a mat over a damp footwell can trap moisture underneath it.
Step 3: Position the New Mat Correctly
Place the mat with the textured or non-slip side down and the finished side facing up—check this before you set it down, since it’s easy to place a mat upside-down on the first try. Slide it into place starting at the firewall, then press down along the edges so it follows the floor’s contours.
The mat’s leading edge should sit as far from the pedals as its shape allows, never touching or overlapping them. If your mat has a heel pad, it should land where your right heel naturally rests, not several inches off to one side.
Some manufacturers list a minimum pedal clearance in the owner’s manual or the mat’s installation sheet—check yours if one came with the mat. If not, Step 5’s full-pedal test is what actually confirms you’re clear, not a guessed measurement.
Step 4: Secure the Mat
Use whatever retention system your car actually has. Factory anchor posts need the mat’s grommet or loop pushed straight down until it clicks, then a tug to confirm it’s locked, not just resting on top. Clip-style retainers snap the mat’s edge into a bracket screwed into the floor pan.
If your car has neither, non-slip backing or hook-and-loop strips are the fallback: press adhesive-backed strips down firmly for about 30 seconds and avoid stepping on that spot for an hour while the adhesive sets.
A mat resting loose on carpet with no locking mechanism at all is not a finished installation, even if it looks straight.
Step 5: Test Pedal Clearance
Sit in the driver’s seat and press the accelerator and brake pedals all the way to the floor at least twice, the way you would during hard braking. Watch the mat’s edge the whole time.
If the mat bunches, lifts, or creeps toward the pedal, it isn’t secured or positioned correctly yet—go back to Step 3 or Step 4 before you drive anywhere. This test takes about 30 seconds, and it’s the one step every source on this topic, including NHTSA, treats as non-negotiable.
Floor Mat Anchor & Fit Reference Table
| Anchor Type | How to Identify It | How to Secure the Mat | Fit Check |
|---|---|---|---|
| Factory anchor post | Small plastic or metal post in the footwell floor | Push the mat’s grommet or loop straight down until it clicks, then tug to confirm | Grommet should sit centered on the post, not stretched to one side |
| Clip-style retainer | Bracket screwed into the floor pan, usually near the firewall | Snap the mat’s edge or loop into the bracket | Mat edge should lie flat once clipped, with no lifted corner |
| Non-slip backing (no anchors) | No posts or brackets visible; mat has a rubber or textured underside | Press firmly into place — no locking step exists | Mat shouldn’t shift when pushed firmly by hand in any direction |
| Adhesive / hook-and-loop strips | Add-on strips, not built into the mat | Peel backing, press for 30 seconds, avoid foot traffic for 1 hour | Strips should sit at all four corners, not just the front edge |
Save or screenshot this reference table—it covers every common anchor type you’ll run into, so you don’t have to guess which securing method applies to your car.
Installing Universal or All-Weather Mats (Trimming for Fit)
A universal mat that hasn’t been trimmed is the single most common cause of pedal interference, because “one size fits most” rarely means “one size fits your exact footwell.”
Lay the untrimmed mat in the footwell and mark the excess with a dry-erase marker or chalk—most universal mats have trim guides printed or embossed on the underside to follow. Remove the mat before cutting; never trim it while it’s still in the car.
Cut along the marked line with sharp scissors or a utility knife, working in a few shallow passes on thicker TPE or rubber mats rather than one deep cut, which tends to leave a ragged edge. Test the fit, and if it still overlaps the pedal or door sill, trim a little more—you can always remove more material, but you can’t put it back.
All-weather mats made from TPE (thermoplastic elastomer) follow this same trimming process. TPE is a rubber-like material that stays flexible in both hot and cold weather, which is why it’s the standard material for mats meant to handle mud, snow, and spills year-round.
Common Floor Mat Installation Mistakes to Avoid
Most floor mat safety issues trace back to one of four avoidable mistakes, not a defective mat.
- Stacking mats. Placing a new mat on top of an old one means the anchors can only secure the bottom layer — the top mat is free to slide no matter how well it’s clipped.
- Skipping the pedal test. A mat can look perfectly positioned while parked and still creep forward under real braking pressure. Step 5 exists for a reason.
- Using the wrong side up. Installing a mat with the finished side down and the grippy side up defeats the entire point of non-slip backing.
- Buying a universal when your car has factory anchors. If your vehicle has anchor posts, a mat without matching grommets will never lock in place, no matter how carefully you position it.
If you’re shopping for a replacement and want to skip the trimming and anchor-guessing altogether, a custom-fit TPE mat built for your exact trim removes most of these mistakes before you even open the box.
Why Mat Position Matters for Safety
An improperly installed floor mat can physically interfere with the accelerator or brake pedal, and NHTSA has treated this as a genuine crash risk for nearly two decades, not a theoretical one.
NHTSA’s current winter driving guidance states plainly that improperly installed floor mats can interfere with pedal operation and increase crash risk, and it specifically recommends following the manufacturer’s installation instructions and using retention clips to secure the mats.
This isn’t a new concern. In September 2007, NHTSA and Toyota announced a recall covering roughly 55,000 all-weather floor mats in 2007 and 2008 Lexus ES 350 and Camry models after the mats were found capable of sliding forward and trapping the accelerator pedal. The consumer advisory that followed also warned drivers never to stack one mat on top of another, since the retention hooks on the bottom mat can’t secure a second mat layered on top.
Here’s the part most guides don’t mention: there’s no federal standard that regulates a floor mat’s grip, backing texture, or thickness. According to an NHTSA regulatory interpretation letter, the only federal requirement that applies to floor mats is FMVSS No. 302, which covers flammability resistance—not fit or traction. That means the securing method you use matters more than anything printed on the mat’s packaging.
FAQs
Which way are car mats supposed to go?
The textured or non-slip side faces down, against the carpet, and the finished side faces up, toward your feet. On the driver’s side, the mat’s heel pad—if it has one—should sit where your right heel naturally rests, not shifted toward the pedals or door sill. Placing a mat upside-down is one of the most common first-time installation mistakes.
How do I install car floor mats?
Remove any old mats, vacuum the footwell thoroughly, and position the new mat against the firewall with the correct side facing up. Lock it onto your car’s factory anchors, clips, or non-slip backing, then press the accelerator and brake fully to the floor to confirm nothing shifts or catches before you drive.
mats to stay in place?
Use whatever retention system your vehicle actually has — factory anchor posts, clip-style retainers, or non-slip backing — rather than relying on the mat’s weight alone. If your car has no built-in anchors, add hook-and-loop strips at all four corners, not just the front edge, for the most secure hold.
How do I get car mats to lay flat?
Bunching almost always means debris is trapped underneath, so remove the mat and vacuum the footwell again before reinstalling. If the mat still won’t lie flat against a deep or angled footwell, a stiffer-backed mat or one with a built-in heel pad will hold its shape better than a thin, flexible one.
Should car floor mats go under the pedals?
No. A properly installed mat should never extend under, touch, or overlap the accelerator, brake, or clutch pedal in any position, regardless of whether the vehicle has factory anchors or non-slip backing. Even a small amount of overlap can catch the pedal during hard braking, which is the exact mechanism behind NHTSA’s documented floor mat recalls.
Can a loose floor mat cause unintended acceleration?
Yes—this is a documented risk, not a rare edge case. NHTSA’s 2007 investigation into Toyota and Lexus vehicles found that unsecured all-weather floor mats could slide forward and physically trap the accelerator pedal in a depressed position, leading to a nationwide recall. Testing pedal clearance after every mat installation is how you rule this out.
What to Do Next
Once your mats are installed and locked in place, the next thing worth doing is keeping them that way — our guide on how to clean TPE floor mats without damaging them covers the wash methods that won’t wear down the non-slip backing you just secured.
If you’re still deciding between materials, our breakdown of the best rubber floor mats compares how rubber holds up against TPE for grip and durability in different climates.
And if a universal mat just isn’t cooperating no matter how much you trim it, a custom-fit mat built for your car’s exact trim solves the fit problem at the source.