
Table of Contents
Your seat covers are stained, torn, or about to be replaced, and now you’re staring at a headrest, wondering where to even start. Removing car-seat covers isn’t complicated once you know which fasteners you’re dealing with—most people finish one seat in under 25 minutes.
Quick Answer: To remove car seat covers, disconnect the negative battery terminal if your seats have airbags, then release the headrest, unfasten the seat back cover (hog rings, hooks, zip ties, or a zipper depending on the cover), remove the seat bottom cover the same way, and then detach any armrest or side panels. Most seats take 15–25 minutes.
What You Need to Know:
- Fastener type (hog rings, hooks, zip ties, or zippers) determines your tools and technique — not the cover material.
- Seats with side airbags need the battery disconnected first; skipping this risks an accidental deployment.
- The headrest always comes off first, before you touch a single fastener on the seat back.
- Universal (slip-on) covers use elastic hems and hooks; fitted covers usually zip or snap—the removal order is the same either way.
- Budget 15–25 minutes per seat the first time you do this.
What You’ll Need
You need four basic hand tools and somewhere to keep small parts organized. A screwdriver, needle-nose pliers, and labeled containers for screws and clips will handle nearly every seat.
- Phillips and flathead screwdriver set
- Needle-nose pliers, for hooks, clips, and hog rings
- Small containers or zip-top bags, labeled by seat section
- Hog ring pliers, only if your covers use hog rings
- A flashlight, for reaching under the seat frame
Before You Start: Safety Prep
Any seat built after the mid-1990s likely has a side airbag stitched into the bolster seam. Disconnect the negative battery terminal and wait at least 90 seconds to a few minutes before touching the seat, matching the wait times automakers specify in their own service procedures for working near SRS-equipped seats, according to NHTSA. Skipping this step to save two minutes is one of the more avoidable ways this job goes wrong.
Park the car somewhere well-lit, put the seat in its most accessible position, and check your owner’s manual for any note about an airbag built into the seat seam itself—that’s a different job entirely (see “When to Call a Professional” below).
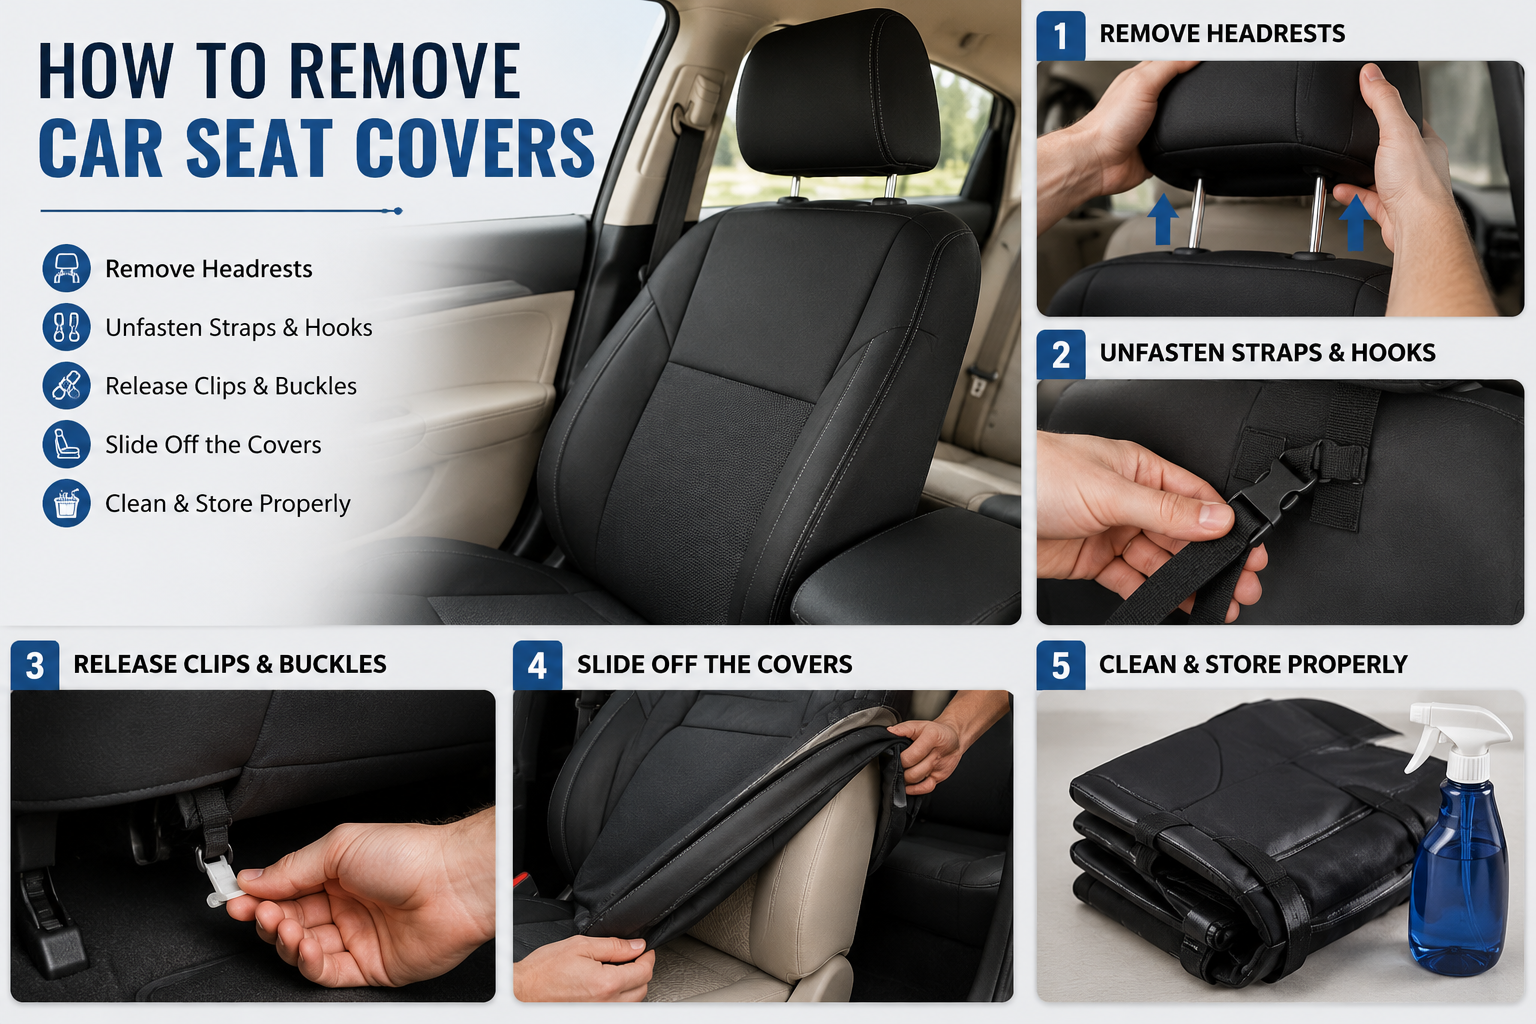
Step 1: Release the Headrest
- Raise the headrest to its highest setting.
- Find the release button or pin on one of the headrest posts—usually the post closer to the door.
- Press the release button while pulling the headrest straight up.
- Set the headrest aside. It goes back on last.
Step 2: Remove the Seat Back Cover
The seat back cover is almost always secured along its bottom and side seams, not across the middle.
- Run a hand along the underside of the seat back to locate the fastener line.
- Work each fastener loose in order. Skipping ahead makes the cover bind on the next one.
- Pull the cover up and over the top of the seat frame once the last fastener releases.
- Disconnect any wiring for heated or ventilated seats before pulling the cover free.
Step 3: Remove the Seat Bottom Cover
- Tilt or remove the seat bottom, if the model allows it, for better access underneath.
- Locate fasteners along the underside edge—typically hog rings or hooks anchored to the seat frame or springs.
- Release each fastener, keeping track of which side it came from.
- Lift the cover away from the cushion.
Step 4: Handle Armrests, Side Panels, and Extras
- Remove screws or clips holding armrest and bolster covers.
- Watch for wiring on power seats, heated seats, or seats with memory settings, and disconnect it before pulling.
- Set every small part in its labeled container as you go.
Identify Your Fastener Type
The fastener holding a cover on — not the fabric — determines how hard this job is. Save or screenshot this table; it covers every removal method you’re likely to run into, regardless of the brand of cover.
| Fastener | What It Looks Like | Tool Needed | Removal Method | Difficulty | Damage Risk |
|---|---|---|---|---|---|
| Hog rings | Small metal C-rings on seams underneath | Hog ring pliers or needle-nose pliers | Squeeze open, slide off | Moderate | Low with the right pliers |
| J-hooks / S-hooks | Metal hooks looped through fabric loops | Flathead screwdriver or pliers | Pry open slightly, unhook | Easy | Low |
| Elastic hem + hooks | Stretch band sewn into the hem | Fingers or pliers | Stretch and unhook by hand | Easy | Very low |
| Zip ties | Plastic strips, common on universal covers | Scissors or utility knife | Cut and discard | Very easy | None to the cover |
| Snaps or Velcro | Fabric snap studs or hook-and-loop strips | None | Pull apart by hand | Very easy | None |
| Integrated zipper | Full-length zipper along the seam | None | Unzip fully before removing | Easy | Low if not forced |
Universal vs. Fitted Seat Covers: Does Removal Differ?
No—the order of operations is identical; only the fastener style changes. Universal (slip-on) covers rely on elastic hems and hooks because they’re built to fit a range of seat shapes. Fitted covers use zippers or snaps because they’re cut for one exact seat. Neither type requires pulling the seat out of the car — only the cover comes off the frame.
Avoiding Damage on Tight or Stuck Covers
A cover that won’t budge almost always has one fastener you haven’t found yet—pulling harder tears the fabric before it releases a hidden hook.
- Stop pulling the moment you feel resistance and re-check the seam for a missed fastener.
- Stiff vinyl or leather covers loosen up if the car sits in indirect sunlight for 10–15 minutes first.
- Never cut a cover free unless it’s already confirmed you’re not reusing it. A zip tie is meant to be cut; a seam is not.
Removing Covers Just to Wash Them
Most fabric and neoprene covers can be removed and machine washed on a gentle, cold cycle—check the care tag first. Leather and vinyl covers should stay on the seat and get wiped down instead, since soaking or machine agitation can dry out or crack the material.
If a printable version of this removal checklist would help for the glovebox, the newsletter signup below sends it out along with the follow-up guide on reinstalling covers correctly the first time. [CONTENT GAP: email capture line/signup placement]
Putting Covers Back On (or Buying New Ones)
Reinstalling follows the same steps in reverse: seat bottom first, then the seat back, then the headrest last. If the covers just removed are torn, permanently stained, or too stretched to hold their shape anymore, a replacement pair sized for the exact seat will hold its fasteners far better than trying to re-stretch a worn one.
Common Mistakes
- Forcing the headrest up without pressing the release pin — this bends or snaps the posts.
- Pulling the cover before finding every fastener, tearing fabric near the last hidden hog ring.
- Skipping the battery disconnect on airbag-equipped seats to save a couple of minutes.
- Losing track of which screws came from which side. Label as you go, not after.
- Machine-washing leather or vinyl covers that should only be wiped down.
FAQ
Can you remove car seat covers to wash them? Yes, for most fabric and neoprene covers with a manufacturer care tag that allows machine washing—usually a gentle, cold cycle. Leather and vinyl covers are the exception: soaking or agitating them in a washer can dry out the material and cause cracking, so those should be wiped down while still installed on the seat.
What tool do you use to remove car seats? A Phillips and flathead screwdriver set and a pair of needle-nose pliers handle most seats. Hog ring pliers are only needed if the fasteners underneath the cover are metal C-rings rather than hooks, zip ties, or a zipper—check the underside seam before buying specialty tools.
Do you have to remove seats to put on seat covers? No. Installing or removing a seat cover only requires detaching the cover from the seat frame, not pulling the entire seat out of the car. The one exception is a full reupholstery job, where a shop may remove the seat for easier access, but that’s a choice, not a requirement.
How do I change my car seat cover? Removal and installation follow the same steps in reverse order. Remove the old cover starting with the headrest, then the seat back, then the seat bottom. Install the new cover starting with the seat bottom, then the seat back, then the headrest, fastening each section the same way the old one was secured.
How long does it take to remove car seat covers? Most seats take 15 to 25 minutes for a first attempt, and closer to 10 minutes once the fastener type is familiar. Seats with hog rings or heated-seat wiring run longer; seats with zip ties or zippers are the fastest.
Can you remove car seat covers without any tools? Sometimes. Covers fastened with snaps, Velcro, or an elastic hem and hooks can often be removed by hand. Covers using hog rings or screwed-in armrest panels need pliers or a screwdriver — trying to force those by hand is a common way covers get torn.
What to Do Next
- [CONTENT GAP: link to “How to Clean Car Seat Covers” guide]
- [CONTENT GAP: link to “How to Install Truck Seat Covers” guide]
When to Call a Professional
- The airbag is built into the seat seam itself, not just the bolster—this isn’t a DIY removal.
- Heated, cooled, or memory seats with wiring harnesses that aren’t clearly traceable.
- Leased or warrantied vehicles, where DIY seat disassembly could affect coverage.

Pingback: How To Remove Stains From A Car Seat Cover (Every Type)