Your new seat covers just showed up, and now you’re standing in the driveway wondering if the installation is a five-minute job or an afternoon project. It’s neither—most trucks take under an hour, and no tools are required beyond your hands.
Quick Answer: Installing truck seat covers takes 30–60 minutes with no special tools for most sets. Work one seat at a time: fit the cover over the headrest, pull it down over the seatback and cushion, then secure the hooks, straps, or discs underneath before moving to the next seat.
What You Need to Know
- Most installs take 30–60 minutes total for a front-and-rear set, no tools required for hook-and-strap covers.
- You rarely need to remove the seats themselves—only the headrests, and only on some models.
- Hardware type (hooks, discs, or elastic straps) changes the install steps more than the truck model does.
- Properly installed covers should never block airbag deployment zones or seat-adjustment controls.
- A loose or wrinkled fit almost always traces back to one of two things: skipped headrest removal or under-tightened hooks.
What You’ll Need Before You Start
Installing truck seat covers takes about 30–60 minutes with no special tools beyond your hands—pliers help with stubborn gaps. Work one seat at a time: fit the cover over the headrest first, then the seatback, then the cushion, and secure the hooks or straps underneath before moving to the next seat.
Gather these first:
- The seat cover set, sorted by seat position (front driver, front passenger, rear bench)
- A pair of needle-nose pliers (for tight hook gaps under the seat)
- A vacuum or brush to clear crumbs and debris before you start
- 30–60 minutes of uninterrupted time—rushing is the 1 cause of a bunched or crooked fit
If you’re installing over factory leather or heated seats, check How to Use Car Seat Cover the Right Way first—heated and cooled seats have a couple of extra compatibility checks worth doing before you start cutting into packaging.
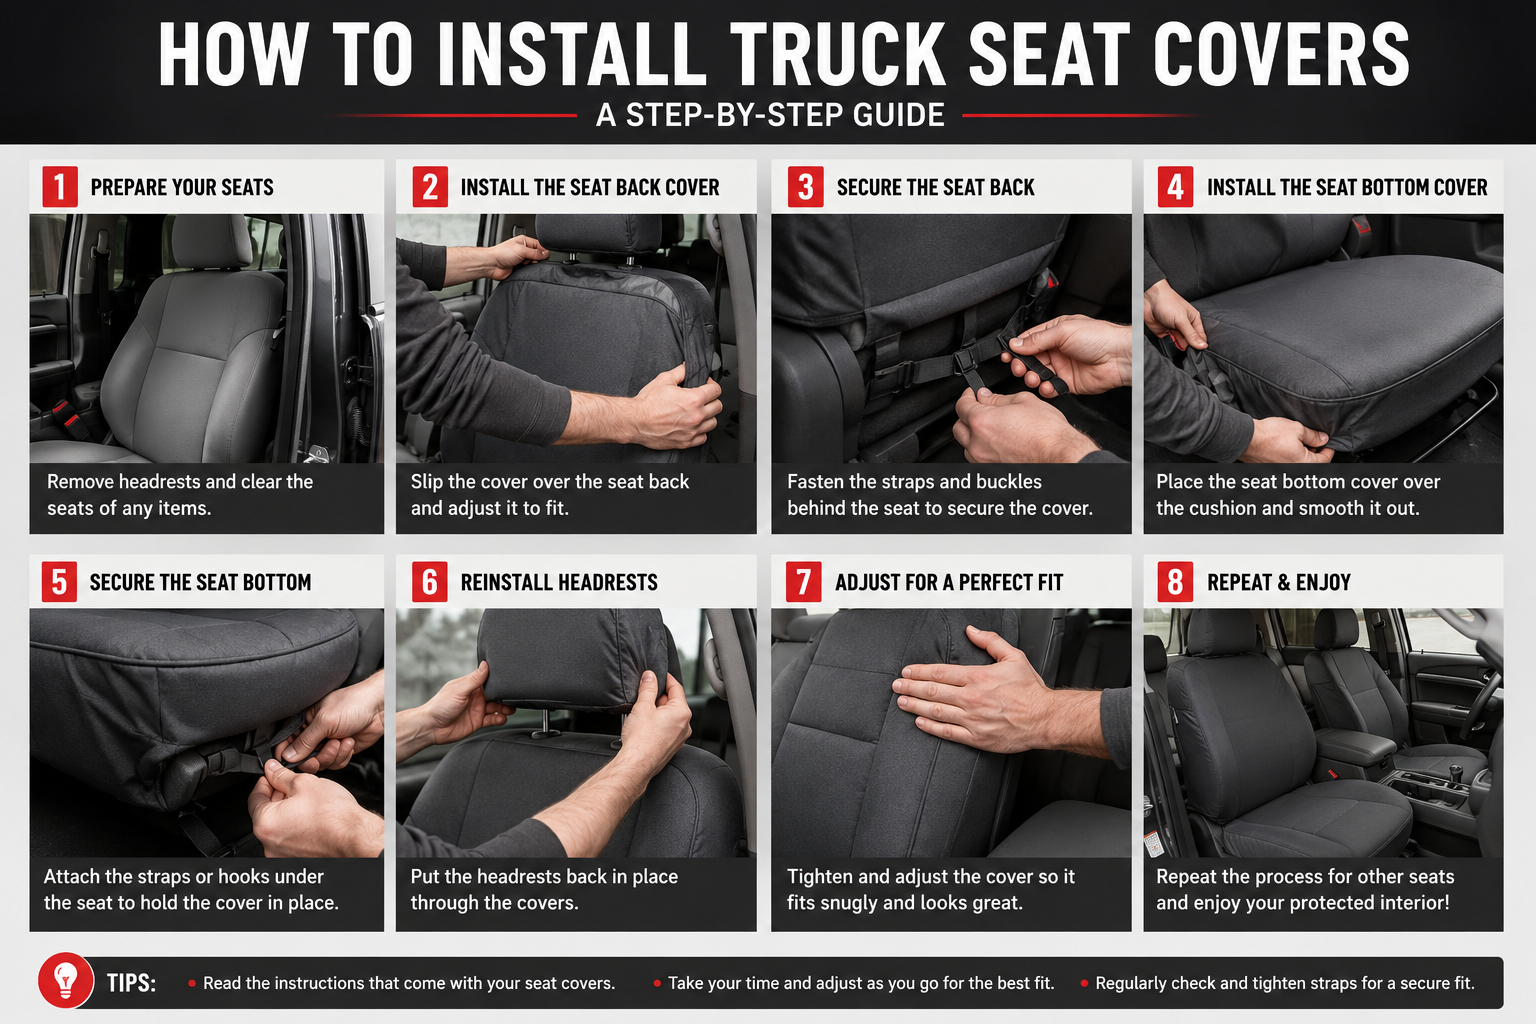
Here is a step-by-step guide on how to install truck seat covers.
1. Clean and prep the seats. Vacuum the seat surfaces and crevices before you install anything. Trapped crumbs, sand, or pet hair will grind against the cover fabric from underneath and cause premature wear — a problem you won’t notice until the cover already looks worn out.
2. Remove the headrests, if your cover requires it. Most headrests pop off with a firm pull after pressing a small release button on the stem. Set them aside; you’ll need them again in step 6. Some universal-fit covers don’t require this—check your instructions before pulling.
3. Fit the seatback cover first, top to bottom. Slide the cover opening over the top of the seatback and work it down like a fitted sheet, aligning any seams with the seat’s natural contours (bolsters, lumbar ridge, headrest posts). Don’t force it—a cover that seems too tight in the first few inches usually just needs the corners squared up.
4. Fit the seat cushion cover back to front. Starting at the rear of the cushion, pull the cover forward and down over the front lip. This is the step where bench-seat covers most often bunch—smooth the fabric across the full width before securing anything.
5. Secure the hooks, straps, or discs underneath the seat. Reach under the seat frame and hook, clip, or strap the cover’s attachment points to the seat’s factory anchor points or frame rails. Pull each one snug—not stretched—working from the center outward so tension is even on both sides.
6. Reattach the headrests and confirm airbag access. Push the headrest posts back through the cover’s headrest openings and snap them back into place. Run your hand along the outer seam of the seatback—if your truck has side airbags, the cover should sit flush there, not bunched, so the seam can release cleanly if the airbag deploys.
Hook, Disc, or Strap? Ensure that the hardware of your cover matches the installation requirements.
The hardware your cover uses changes the install steps far more than your truck’s make or model does. Before you start, check which system your set uses—it’s usually printed on the packaging or instruction card.
| Hardware Type | How It Attaches | Install Difficulty | Best Suited For |
|---|---|---|---|
| Hook-only | Metal or plastic hooks clip directly to factory seat wire frames | Easiest — no tools | Bucket seats with exposed frame wires |
| Hook-and-disc | Hooks clip to a plastic disc anchored under the seat first | Moderate — disc placement takes a few extra minutes | Seats without accessible frame wires |
| Elastic strap | Adjustable straps cinch and buckle underneath the seat | Easy, most forgiving fit | Irregular or older seat shapes |
| Integrated zipper | Cover halves zip together around the seat before hooks are set | Hardest — zipper alignment matters | Tailored/custom-fit seat covers |
Save or screenshot this hardware guide—it covers every attachment system you’re likely to run into on a truck seat cover, no matter which brand made it.
Covers using hooks and discs together are common on trucks where the factory seat frame isn’t directly accessible—the disc gives the hook something to anchor to. If your instructions mention both, install the discs first, in step 5, before attaching the hooks to them.
Installing Front Bucket Seats vs. Bench Seats
Front bucket seats and rear bench seats need slightly different handling around the console and armrests. Bucket seats are more forgiving because each seat is a self-contained shape; bench seats require managing width and any fold-down center sections.
For front bucket seats, work each seat fully—steps 1 through 6—before starting the other side. Trying to do both seats simultaneously is where most people lose track of which hook goes where.
For a bench seat, install the seatback cover across the full width first, then the cushion, checking that the fabric is pulled evenly from both ends toward the middle before you secure any hooks.
Rear Bench Covers with a Fold-Down Armrest
A fold-down center armrest needs its own opening in the cover, and skipping this step is the most common rear-bench installation mistake. Most bench covers designed for trucks include a slit or flap specifically for this.
Before securing the rear bench cover’s hooks, locate the console/armrest cutout in the cover and fold the armrest down through it to confirm the opening lines up. If it’s off by more than an inch, the cover is likely installed backward or upside down—flip it and recheck before tightening anything.
Will Seat Covers Interfere With Airbags or Seat Heaters?
Properly installed seat covers should never block airbag deployment or disable seat heaters, but both deserve a specific check. Most seat cover manufacturers design the seam over the airbag zone to be foam-backed and built to tear away cleanly under deployment force — a detail most buyers never think to look for.
For seat heaters and coolers, check your cover’s packaging for compatibility before installing—perforated or mesh-backed panels over the heated zone are the standard fix. If your truck uses side or curtain airbags integrated into the seat bolster (less common, but present on some newer trims), confirm your cover is rated for that seat before installing, or have it professionally fitted.
Fixing a Loose or Wrinkled Fit After Installation
A loose or wrinkled cover almost always comes down to one of two fixes: re-tightening the underside hooks or redoing the headrest step you skipped. Neither requires starting over.
Reach back under the seat and retighten any hook or strap that feels slack—tension loosens naturally in the first few days as the fabric settles. If wrinkles concentrate around the headrest posts specifically, the cover likely wasn’t pulled taut before the headrest went back in; pop the headrest off, reseat the fabric, and reattach it.
For covers that still look dull or dusty after a proper fit, How to Clean Car Seat Covers walks through the safe cleaning steps for the material you’re working with.
Haven’t Picked Your Seat Covers Yet?
If you’re reading this before buying, hook-and-strap systems are consistently the easiest for a first-time DIY install—worth weighing alongside fit and material. Best Carhartt Seat Covers for Trucks in 2026 breaks down which sets balance durability with an easy install, and if you drive a Ranger specifically, Best Ford Ranger Seat Covers compares custom-fit against universal options for exactly this trade-off.
FAQ
How do I install seat covers with hooks?
Hook-style covers clip directly to your seat’s factory frame wires. After fitting the fabric over the seatback and cushion, reach underneath, locate the exposed metal frame, and clip each hook on, pulling snug from the center outward so tension is even across the seat.
How do I install seat covers with hooks and discs?
Install the plastic discs first, anchoring them to the seat’s underside mounting points per your instructions, then clip the cover’s hooks onto the discs rather than the frame directly. This system is common on seats where the factory frame isn’t easily accessible by hand.
Does the installation process change by brand?
The core steps stay the same, but hardware differs—some brands use hooks, others use discs, straps, or zippers. Check your specific set’s instruction card for which system it uses before starting, since that determines step 5 more than the truck model does.
How do I put seat covers on a front seat?
Fit the seatback cover over the top first, working it down like a fitted sheet, then fit the cushion cover from back to front. Secure any hooks or straps underneath last, working from the center of the seat outward for even tension.
How long does a full truck seat cover installation take?
Most front-and-rear installations take 30 to 60 minutes total, depending on your truck’s seat configuration and which hardware system your covers use. Bench seats with fold-down armrests typically add a few extra minutes for the armrest cutout alignment.
Do I need any tools to install truck seat covers?
Most hook-and-strap covers need no tools at all. A pair of needle-nose pliers can help if a hook is in a tight gap under the seat, but it’s a convenience, not a requirement, for the majority of universal and semi-custom sets.
What to Do Next
Once your covers are installed and settled in, How to Clean Car Seat Covers is worth bookmarking for the first time they need a proper wash. If you’re still deciding between hardware types or brands, Best Carhartt Seat Covers for Trucks in 2026 and Best Ford Ranger Seat Covers (2026) both weigh install-friendliness alongside fit and durability.